

How To Mount Blink Camera To Brick
So yous have your brand new Blink camera and are fix to mount it somewhere. Where do you lot beginning?
We put together this guide to assist you effigy out what type of mounting solution is best for your application and where to get what y'all need.
We volition go over the best location to install Blink, instructions on mounting it with and without screws, different mounting options, accessories, unlike mounting ideas, troubleshooting, tips, and a quick FAQ.
If you are mounting a Glimmer doorbell, look here for our Blink video doorbell installation instructions.
Best Place to A Mountain Blink Camera & Mounting Tips
Are y'all wondering where to mount your Blink camera? There are many different location options, but it is probably apparent to you that:
- It needs to exist in a location that allows the camera to record the function of your holding y'all want to monitor.
- If hiding your camera is essential to yous, it must be in a identify that is not obvious for people to await at.
- If you are using motility detection on your camera, you will need to place it in an surface area with a decent corporeality of ambient lighting, or motility will exist difficult to detect.
- If y'all do not want the camera recording all the time, consider areas around your home that get less traffic.
- Y'all need to consider if your camera will exist in a stock-still or moving position and what weather condition may affect its functionality (wind, rain, etc.).
Earlier purchasing whatsoever mounting hardware, delight ensure you have considered all of these factors and are confident that your intended location is optimal for your situation.
What Is the Best Glimmer Camera Mounting Superlative?
The best height for your outdoor photographic camera depends on your specific needs. The about common recommended heights are between heart level and chest level, only the bodily top will vary based on many factors, including:
- Your specific security needs Your particular setup requirements.
- The amount of space available.
- A skilful rule of thumb for indoor utilize is to identify your camera at eye level with the person existence recorded.
- If you are mounting it to a ceiling, this commonly ways that the sensor should exist positioned about a pes below the ceiling line at eye level. For ceilings taller than this, y'all may want to utilise a ceiling extension pole to extend the sensor upwards. For ceilings shorter than this, you may need to get a tilting camera to point it downwards while still keeping it at middle level with the person being recorded. Alternatively, you could apply a stand to elevate the sensor to your heart level while keeping it close to the ceiling.
How to Mount a Glimmer Outdoor Photographic camera
Attaching a Glimmer outdoor photographic camera to mount is not intimidating – it'southward straightforward!
Later in this commodity, we volition take a more detailed look at different mounting solutions for locations around your habitation. All of these mount in slightly different ways merely the steps are basically the same. If you are using the mounting hardware that came with the camera, these are the steps:
- Choose the location where yous desire to mountain your photographic camera.
- Place the bracket on the area where y'all want to install the photographic camera and note where you demand to drill the holes.
- Drill airplane pilot holes.
- Screw the mount into the pilot holes.
- Attach the camera to the mountain.
How to Mountain Glimmer Camera Without Screws
There may be a identify where you lot want to install your photographic camera simply practice not desire to drill holes into the expanse.
Why wouldn't you want to use screws? Maybe the material is vinyl siding, stucco, or a window. Or mayhap you are installing on a wood contend where you lot do not want to damage the wood. Peradventure you have a unique decorative light yous want to hide away by hanging your blink camera from it?
No matter what the reason is, here are some cracking alternatives for attaching a blink camera without screws:
- Magnetic mount– a magnetic mount allows y'all to connect your glimmer outdoor camera to near any metal surface.
- Suction loving cup camera mountain – a suction cup mountain will enable you to secure your blink outdoor camera to any polish surface similar a window or mirror.
- Adhesive mount – an adhesive mount allows you to attach your glimmer outdoor camera to any flat, non-porous surface like glass or plastic.
Blink Camera Mount Bracket Ideas, Options & Accessories
Since there are and then many unlike means to mount 1 of these cameras, many other options are available to meet every need.
Best Blink Outdoor Camera Mount – All-New Glimmer Outdoor Camera Wall Mountain

This high-quality bracket can be mounted anywhere exterior and is our best choice for a wall mount for your outdoor cameras. These are, to me, the best wall mounting solutions for a Blink camera arrangement.
The weatherproof protective housing lets you lot stand your blink camera on any surface. The 360° rotation will enable you lot to position your camera at whatsoever bending so you can capture the perfect shot. The rust-resistant housing allows you to set your camera in fifty-fifty the most extreme conditions.
The Blink Sync module allows you to hands command multiple cameras from 1 place and the included Micro USB cable charges both the camera and the sync module simultaneously.
Window Mount – Teccle Window Mount

This revolutionary new camera mounting system sticks firmly to all types of windows. The peel & stick adhesive makes installation quick and like shooting fish in a barrel. The camera is safely housed inside, preventing someone from potentially swiping information technology on you lot.
It's super easy to install and tin can hold up to 5 pounds – perfect for your outdoor security cameras! And information technology can be removed without leaving any residue! Installation is every bit simple equally peeling the bankroll off the pad and sticking information technology to your window!
Floodlight Photographic camera Mount

The floodlight camera mounting kit lets you calorie-free up the expanse where you are recording video from up to x meters away. The HD smart security LED floodlight camera is excellent for capturing footage at night!
Each kit includes everything you need to set it upwards in minutes. Two-year battery life eliminates the hassle of replacing batteries.
Indoor Camera Mount

Indoor camera mounts allow you to install indoor cameras anywhere within your dwelling.
They are pretty modest, making them somewhat discrete. They come in two varieties: one with a born magnet and one without a magnet. Both types can be screwed into a wall, ceiling, or other flat surfaces, then mounted to your indoor security camera.
Pointing one of these out your window to the outside also helps to lower the take a chance of your Blink camera being stolen.
Mini Camera Mount

If you are using a Blink Mini, you can get a mount specifically for this particular camera.
These wall mounts can be quickly adapted with 360° hinge and 90° tilt angles to find the perfect viewing angle for your surveillance needs. Y'all can even tilt it upside downward if you want to monitor the ceiling!
They come up with everything y'all demand to install them, including screws and anchors.
Adhesive Mountain For Vinyl Siding Or Stucco

Yous probably do not want to drill holes if you install the photographic camera on an exterior wall with vinyl siding or stucco.
Using a solid agglutinative instead of screws will allow you to avoid drilling holes in the material and will not damage the material. This selection is excellent if you lot need to place a camera in an expanse such as this that is fabricated of vinyl or stucco, and you want to avert whatsoever impairment to your walls or siding.
They are also keen for places you want to monitor that are hard to reach, like high-upward ceilings or tight spaces. They are super like shooting fish in a barrel to install besides! You just peel off the backing and apply them directly to where you want to place your photographic camera.
Anti Theft Mount

If you are having issues with your cameras missing, an anti-theft mount might be the correct choice. These have a muzzle around them that makes it nearly impossible to remove them from the wall without beingness noticed.
The muzzle tin can also deter would-exist thieves because they do non want to be seen with the security photographic camera on them. Just be careful of where y'all place your anti-theft mounts – they can be difficult to remove from the wall and could cause damage to your walls if you pull too hard!
Brick Mountain

A brick clip mounting system is an excellent option if you are trying to install an outdoor security camera on a brick wall. These simple little devices will allow you lot to easily install a camera on a wall fabricated of brick.
You simply demand one brick clip for each hole in your brick, and and then attach the prune to the camera and the wall! This is a great manner to get up and running quickly – no drilling required! You tin speedily remove this setup if you no longer need it – just pull the clips from the wall and the camera and and so take them with yous! Brick clips come in a variety of
Corner Mountain

A corner mount is a simple way to mount your outdoor security cameras to a corner. These are very useful when installing a security camera in the corner of a room or even the corner of a building!
They attach to the corner of the building, and and so you can connect your camera to them. They are piece of cake to use. Merely spiral them into the corner and adhere your camera to the mount! Y'all tin turn the camera around to get the all-time viewing angle for your needs. Piece of cake to install, easy to uninstall! Bully for when you need to move it somewhere else! Very unimposing!
Door Mountain

A door mount is an piece of cake way to mount an outdoor security camera to a doorway. This is adept for monitoring the entrance to your home or building without having to drill holes or use an adhesive on the wall. This door mount attaches to the elevation of your door with a clip.
This is great for monitoring your front, back, or even side doors in your home or edifice! Works excellent on doors fabricated of wood, metallic, or plastic! Installs in minutes.
Gutter Mountain

A gutter mountain is a peachy way to keep your outdoor security cameras away from wet and protected from atmospheric condition elements similar pelting, snow, and wind. This is an excellent pick when y'all do not want to drill holes in your roof just all the same want to monitor that area from above.
This gutter clamp allows you to easily adhere it to your gutters then that you can attach a photographic camera to it and become a great view from upwards there! It is quick and piece of cake to install, just place information technology in the desired location, spiral it in, and attach your photographic camera!
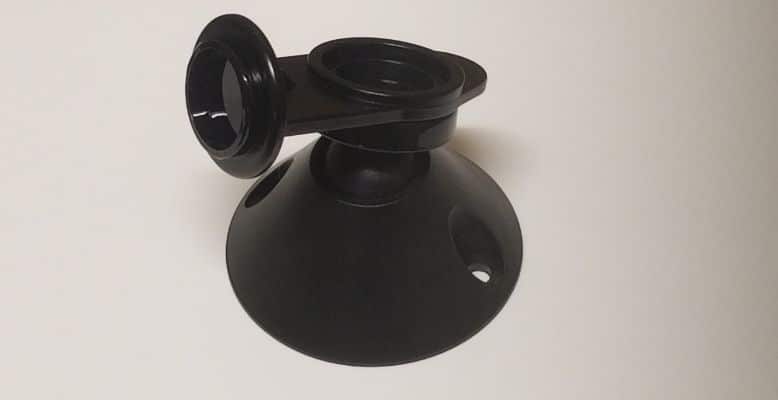
Suction Cup Mountain

A suction cup mount is a great way to get your outdoor security cameras up high without needing to drill holes or utilize adhesives on the wall. They are effortless to set up – just attach them to any shine, not-porous surface!
The camera attaches to the suction cup, so you tin accommodate the bending equally needed! Cracking for windows, doors, and other smoothen surfaces. Information technology tin be used in both indoor and outdoor locations. It can concord up to the weight of a Blink XT. Simple and quick installation! Does not damage the surface information technology is attached to! Like shooting fish in a barrel to move if needed!
Tree Mount

While there isn't a specific tree mountain, you tin employ a twist mount on a tree, assuming that the tree is small-scale enough. Simply use twist mounts on the branch, place the cameras in the mounts, and then twist the mounts onto the co-operative to lock them in place.
You will need to ensure that you lot have suitable mounts for your cameras, every bit the Twist Mini and the Twist Standard both have unlike mounting threads, then you lot cannot employ them interchangeably. Yous will also need to ensure that there is enough room for the cameras and that the branches are strong plenty to hold the cameras in place.
Solar Mount

A solar console charging mount is a great mode to power your Glimmer XT without running wires from an outlet to your Blink XT. This makes it an excellent pick for placing your Blink XT in a remote location where information technology would be inconvenient to run wires.
This solar panel charging kit has a mounting bracket that allows you to speedily and easily attach it to a wall or pole. Information technology comes with everything you need to get started – the solar panel, a weatherproof junction box, and a power adapter with a built-in USB port that you can use to accuse your devices while out in the field.
The solar panel is adjustable, and then you tin can aim it towards the sun to maximize the sunlight it receives throughout the day. In one case the sun goes down, it will automatically switch to a backup battery to keep your photographic camera powered throughout the night.
Clench Mount

A clamp mount is a simple device that can attach to almost any surface to allow you to place an outdoor security camera on information technology. This is useful when yous need a discreet way to monitor an area equally it does not draw attending to itself or the camera.
There are a variety of clamp styles to cull from – some that can be attached to a apartment surface like a wall or a pole, and some that can be fastened to a circular object like a pipe or a tree trunk. Various styles are available, then you lot tin get the one that best fits your needs.
Wall Outlet Mount

A wall outlet mountain allows you to quickly and hands place an outdoor security camera on a wall that already has a ability outlet in it. This allows you lot to easily power your Blink XT without running wires.
It plugs directly into the wall outlet, and so you practice not have to drill any holes into the wall. The included power adapter has a USB port that you lot tin utilise to charge your device while out in the field.
Mountain Extension

A mountain extension can be used to lengthen an existing wall mount. This is helpful if you need more length than the original wall mount. It is easy to install – just slide it to the finish of the existing wall mountain and tighten the screws! Comes in a multifariousness of lengths, so you can pick the one that best fits your needs!
How to Remove Glimmer Camera From Mountain
Removing your camera from most mounts is super elementary! Pull the photographic camera firmly abroad from the mountain; it should come off without any issues.
Blink Camera Mount Troubleshooting
Are yous experiencing any specific issues with your mount? Here are some of the about common issues that can arise and how to deal with them.
Glimmer Camera Won't Snap Into Mount
If your camera does non snap into the mount, ensure it is seated properly. If it is at an bending, try sliding it into place again, so it's straight with the slot.
If it yet doesn't snap in, attempt rotating the screw in the bracket slightly so the photographic camera can slide into it more than hands. If this doesn't work, you lot may need to supercede your bracket with a uniform ane. We accept listed compatible brackets to a higher place.
FAQ
Practice Glimmer Outdoor Cameras Come With Mounts?
Yeah, Blink cameras come with basic mounting hardware included. This blazon volition permit yous to mount to most flat surfaces with screws. However, if you are looking for another mounting solution for your specific state of affairs, you can read nigh alternate mounts in the section higher up.
Conclusion
Mounting your Glimmer camera properly all comes downwardly to your specific situation and what features you need nigh from your outdoor security camera. All the mounts we mentioned here are great choices – they are all high-quality mounts that volition provide years of reliable service if properly maintained.
They are waterproof, durable, and easy to install and use, making them an first-class pick for securing your home, office, or small concern. Ultimately, the pick is yours – just cull the 1 that best suits your needs and budget!
Source: https://www.dumbswitches.com/blink-camera-mount/
0 Response to "How To Mount Blink Camera To Brick"
Post a Comment